Buying a home represents one of your largest financial commitments—which is why a thorough home inspection is non-negotiable. For Staten Island buyers, the inspection process carries added weight: older housing stock, Hurricane Sandy’s lasting effects, and unique regional concerns like oil tanks and flood zones all demand expert scrutiny.
This guide walks you through the exact home inspection checklist that professional home inspectors use to examine, what you should watch for as a buyer, and how to use your inspection report strategically during negotiations. Whether you’re eyeing a pre-war colonial in St. George or a ranch in Great Kills, these insights will help you make an informed purchase decision.
Table of Contents
What Is a Home Inspection and Why Does It Matter?
A home inspection is a comprehensive, non-invasive visual examination of a property’s physical structure and major systems—from the foundation to the roof. Licensed inspectors evaluate the condition of critical components and identify defects, safety hazards, and items needing repair or replacement.
In Staten Island’s market, where many homes were built before 1950 and coastal properties face ongoing flood risk, inspections serve as your primary defense against costly surprises. The inspection report gives you leverage to negotiate repairs, request price reductions, or—in cases of severe issues—walk away from the deal entirely.
Home Inspection Costs in Staten Island
Expect to pay $400 to $600 for a standard home inspection on Staten Island. Factors affecting cost include property size, age, and whether you’re adding specialized tests (termites, oil tanks, radon). Most inspections take 2 to 4 hours, though larger or older properties may require more time.
This upfront investment protects you from far greater expenses down the line. Undiscovered foundation cracks, outdated electrical systems, or hidden water damage can cost tens of thousands to remediate.
When Home Inspections Happen in the Buying Process
The inspection typically occurs 7 to 10 days after your offer is accepted, during the “attorney review” or “due diligence” period. Your purchase contract should include an inspection contingency, which allows you to renegotiate terms or cancel the deal if significant issues surface—without forfeiting your earnest money deposit.
Attend the inspection in person. Walking through with the inspector lets you ask questions, understand the home’s systems, and get maintenance guidance you’ll use as a homeowner. For more on how contingencies work in your contract, see our guide to contingency clauses in NYC real estate contracts.
Complete Home Inspection Checklist
Here’s what licensed inspectors examine during a comprehensive home inspection. Use this checklist when touring properties or attending your scheduled inspection.
Exterior Inspection Checklist
Foundation & Structural Elements
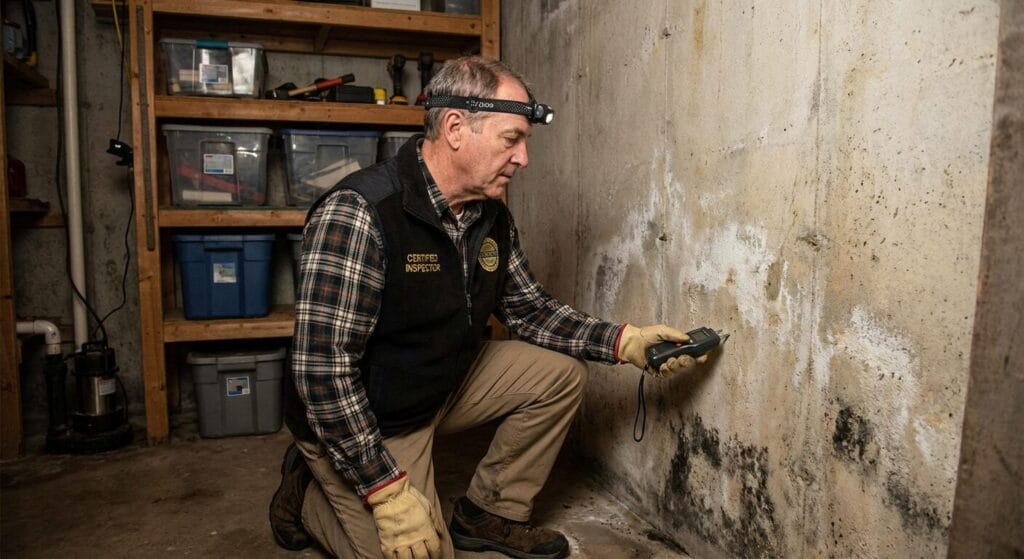
- Foundation is free from major cracks, bowing, or water stains
- Proper grading slopes away from the house (minimum 6″ drop over 10 feet)
- No visible settling or shifting in the foundation
- Basement or crawlspace shows no signs of moisture intrusion
- Sill plates and floor joists are sound, with no rot or insect damage
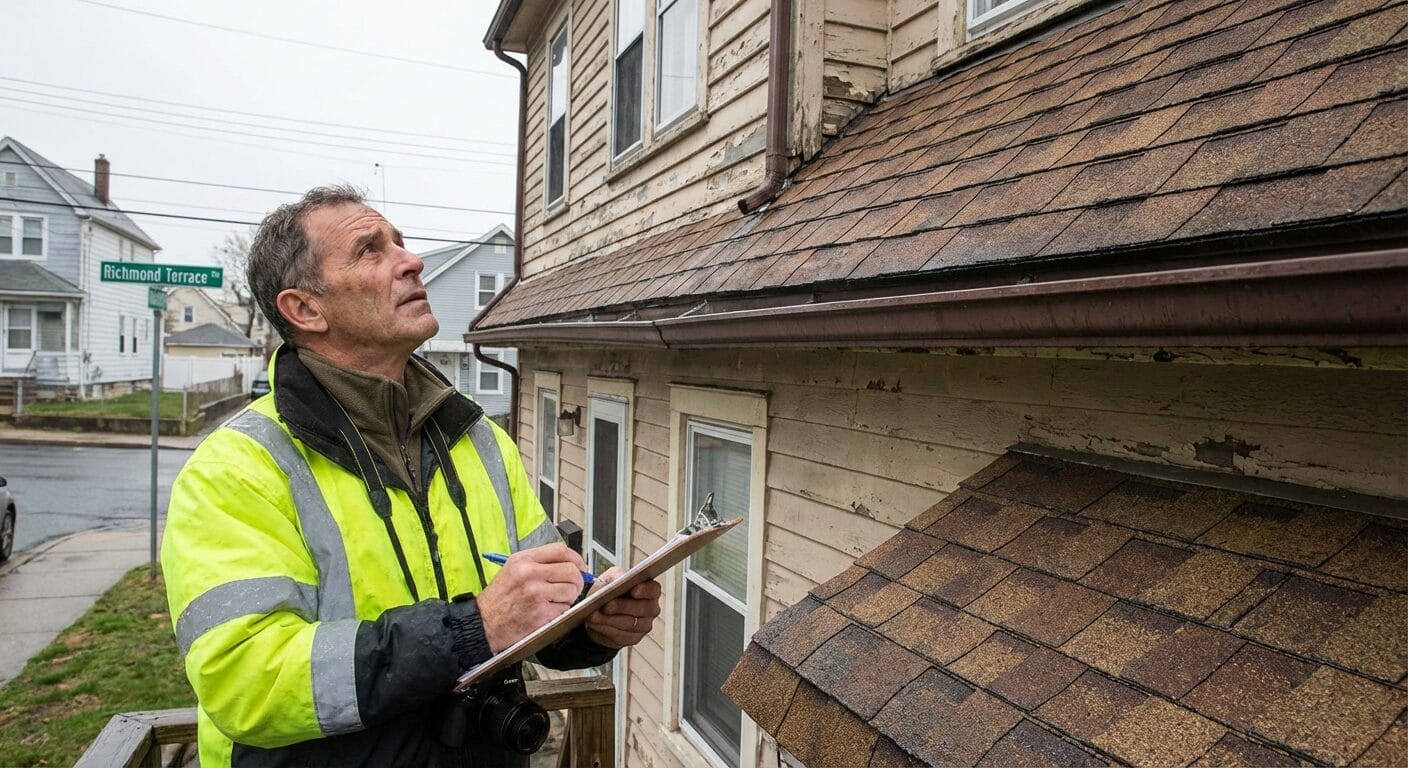
Roof & Attic
- Shingles are intact with no curling, missing pieces, or excessive granule loss
- Flashing around chimneys, vents, and skylights is secure and properly sealed
- Gutters and downspouts are attached firmly, draining water away from foundation
- Soffit and fascia boards show no rot, decay, or pest damage
- Attic insulation meets current standards (R-38 to R-60 for Staten Island climate)
- Attic ventilation is adequate (soffit vents, ridge vents, or gable vents present)
- No evidence of roof leaks (water stains on rafters or decking)
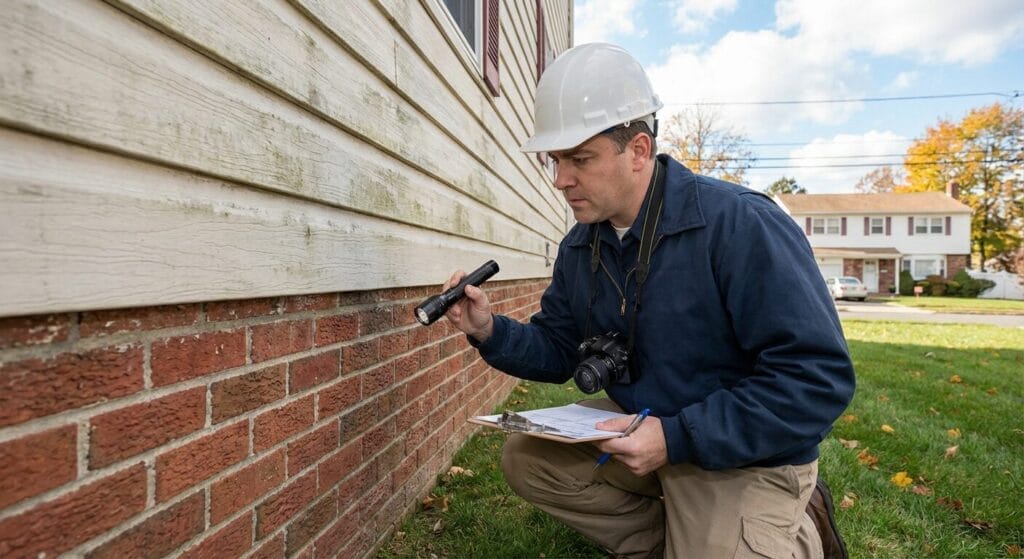
Exterior Walls & Siding
- Siding (vinyl, wood, brick, or stucco) is in good condition with no cracks or warping
- Adequate clearance between ground and wood components (minimum 6 inches)
- Exterior paint or finish shows no widespread peeling or deterioration
- Windows and doors operate smoothly; frames are plumb and weather-sealed
- Storm windows or thermal-pane glass is installed and functional
Drainage & Grading
- Property slopes away from the foundation on all sides
- No standing water or pooling near the house
- French drains or drainage systems are visible and functional (particularly important in flood-prone areas)
- Sump pump is present in basement and operational
Driveway, Walkways & Retaining Walls
- Concrete or asphalt surfaces are free from major cracks or settling
- Walkways are level with no trip hazards
- Retaining walls are structurally sound with no leaning or bulging
- Steps and railings are secure
Interior Inspection Checklist
Walls, Ceilings & Floors
- Walls and ceilings are plumb and level with no significant cracks
- No water stains or discoloration indicating leaks
- Flooring materials (hardwood, tile, carpet) are in good condition
- No bouncy or sagging floors suggesting structural issues
- Interior doors operate properly and latch securely
Windows & Doors
- All windows open, close, and lock properly
- No broken glass or failed seals in double-pane windows
- Weather-stripping is intact around windows and exterior doors
- Screens are present and functional
Kitchen
- Cabinets are securely mounted with functional hardware
- Countertops are in good condition with no major cracks
- Sink drains properly with no leaks underneath
- Faucets operate with adequate water pressure
- Built-in appliances (range, dishwasher, disposal) are functional
Bathrooms
- Toilets flush properly with no leaks at the base
- Sinks and tubs drain without backing up
- Shower/tub enclosures are properly sealed (no grout deterioration)
- Exhaust fans are operational and vented to exterior
- No soft spots in flooring around fixtures
Systems & Mechanicals Checklist
Heating System (HVAC)
- Furnace or boiler is operational and adequately sized for the home
- System age is documented (typical lifespan: 15-20 years)
- Heat exchanger shows no cracks or rust (critical safety issue)
- Ductwork is properly sealed with no disconnected sections
- Thermostat controls system effectively
- Recent service records are available
Air Conditioning
- Central AC or window units are functional
- Compressor and condenser operate without unusual noises
- Refrigerant lines are insulated and in good condition
- Condensate drain is clear and draining properly
Electrical System
- Electrical panel has adequate capacity (minimum 100-amp service, 200-amp preferred)
- No double-tapped breakers or signs of overheating
- GFCI outlets are present in bathrooms, kitchen, and outdoor locations
- Light fixtures and switches operate properly throughout
- No aluminum wiring (fire hazard in homes built 1965-1973)
- No active knob-and-tube wiring (common in pre-1950 Staten Island homes)
Plumbing System
- Water pressure is adequate throughout the home
- No visible leaks at fixtures, under sinks, or in basement
- Hot water heater is functional with no rust or corrosion
- Water heater age is documented (typical lifespan: 8-12 years)
- Supply pipes show no signs of leakage or deterioration
- Drain lines are clear and flowing properly
- Sewer line shows no evidence of blockage or backup
Insulation & Ventilation
- Adequate insulation in attic, walls, and basement
- Vapor barriers are properly installed in crawlspaces
- Bathroom and kitchen exhaust fans vent to exterior (not into attic)
- Attic ventilation prevents moisture buildup
Staten Island-Specific Inspection Considerations
Staten Island’s housing stock and environmental factors create unique inspection priorities that buyers must address. Your inspector should pay special attention to these local concerns.
Flood Zone Properties: Critical Due Diligence
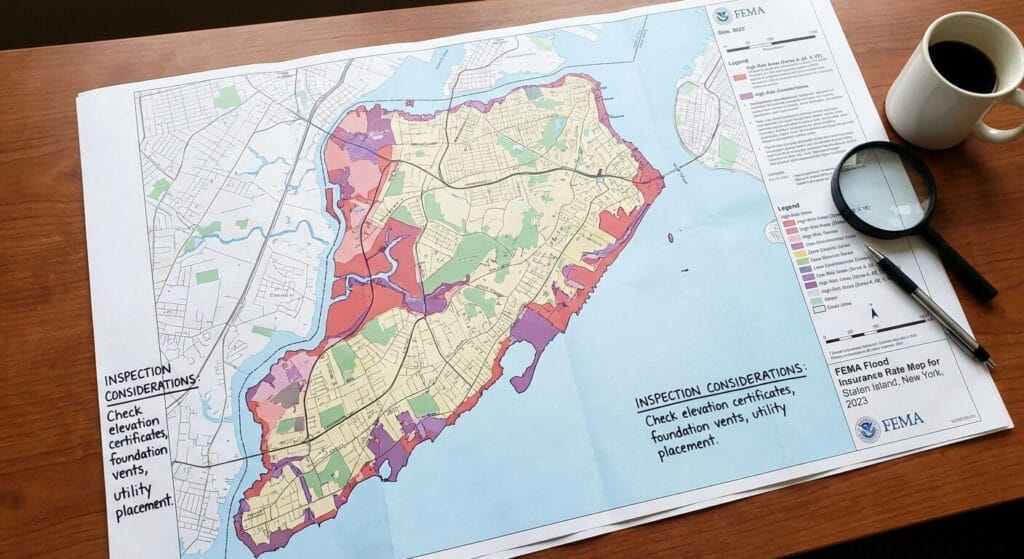
Staten Island has several FEMA-designated flood zones that affect insurance requirements and property values. Understanding your property’s flood risk is essential before purchasing.
Flood Zone Designations on Staten Island:
- Zone X (Unshaded): Minimal flood risk—most of Staten Island’s interior falls in this category
- Zone X (Shaded): Moderate flood risk (0.2% annual chance)—wraps around the island’s perimeter
- Zone AE: High flood risk with established base flood elevations—covers most of Staten Island’s coastline
- Zone VE: Highest risk coastal areas with wave action—includes South Shore beaches and East Shore piers
- Zone A: High flood risk without established elevations—found near Arthur Kill creeks and isolated inland areas
Properties in high-risk zones (A, AE, VE) require flood insurance if you’re using a federally backed mortgage. Annual premiums can range from $400 to $3,000+ depending on elevation relative to base flood levels. Check FEMA’s Flood Map Service Center to verify your property’s zone designation.
Hurricane Sandy Legacy Issues
Hurricane Sandy struck Staten Island in October 2012, causing catastrophic damage to coastal communities. Neighborhoods like Midland Beach, New Dorp, and Oakwood experienced severe flooding—some areas saw water levels 6 to 18 feet above ground.
Red Flags to Watch For in Previously Flooded Homes:
- Evidence of past water intrusion: stains, discoloration, or warping in baseboards and drywall
- Recently replaced mechanicals (furnace, hot water heater) without documented reasons
- Mismatched or obviously newer flooring materials in lower levels
- Basement or foundation repairs that aren’t fully disclosed
- Mold or mildew odors, particularly in finished basements
Ask your inspector to examine the basement and first-floor elevations carefully. Request disclosure documents that detail any Sandy-related damage and repairs. Many homeowners received FEMA grants or insurance payouts for remediation—these should be documented in the property’s history.
Older Housing Stock Concerns
Many Staten Island homes date to the early-to-mid 20th century, particularly on the North Shore. Pre-1950s construction presents specific challenges:
Common Issues in Older Staten Island Homes:
- Outdated Electrical Systems: 60-amp service, knob-and-tube wiring, ungrounded outlets
- Original Plumbing: Galvanized steel pipes prone to corrosion and reduced water flow
- Foundation Settlement: Natural settling can create cracks, uneven floors, and sticking doors
- Asbestos Materials: Insulation, floor tiles, and siding in homes built before 1980
- Lead Paint: Present in most homes built before 1978; deteriorating paint poses health risks
- Inadequate Insulation: Older homes often lack proper attic and wall insulation
None of these issues automatically disqualify a property, but they affect your negotiating position and budgeting. A charming 1920s colonial in Stapleton may need $15,000 to $30,000 in electrical and plumbing upgrades to meet modern standards.
Termite Inspections: Often Required by Lenders
Termite inspections are separate from standard home inspections and are frequently mandated by FHA and VA lenders for properties in the New York area. Even if not required, termite inspections are strongly recommended for Staten Island homes—particularly older properties with wood framing and siding.
What Termite Inspectors Examine:
- Visible wood components throughout the structure
- Basement and crawlspace areas for mud tubes (termite highways)
- Evidence of wood damage, including hollowed-out beams or studs
- Presence of termite swarmers or discarded wings
- Moisture conditions that attract termites
A termite inspection typically costs $75 to $150 on Staten Island. If active termites are found, treatment ranges from $500 to $2,500 depending on the infestation’s severity. Structural damage from termites can require tens of thousands in repairs if left untreated over time.
Ask your real estate attorney if a termite inspection is advisable for your specific property. For more details on New York lender requirements, visit the InterNACHI termite inspection guidelines.
Oil Tank Inspections: A Staten Island Essential
Many older Staten Island homes still use heating oil, stored in underground or basement tanks. These tanks, if leaking, can create environmental nightmares and cleanup bills exceeding $20,000.
Oil Tank Inspection Checklist:
- Determine tank location (underground, basement, or aboveground)
- Document tank age and construction (steel tanks typically last 15-20 years)
- Check for visible rust, corrosion, or leakage
- Test soil around underground tanks for contamination
- Verify fill and vent pipes are secure and properly capped
- Review recent oil delivery records for unexplained usage increases
If an underground tank is present and is 15+ years old, consider requesting its removal as a condition of sale. Tank removal costs $1,500 to $3,000, while cleanup from a leaking tank can run $20,000 to $50,000 or more. Many homeowners insurance policies exclude “pollution” damage, leaving you potentially liable.
Modern alternatives include aboveground basement tanks (double-walled for safety) or conversion to natural gas heating. Discuss options with your inspector and factor replacement costs into your offer negotiations.
How to Choose a Home Inspector in Staten Island
Your inspector’s competence directly affects the quality of information you receive. Don’t simply accept your real estate agent’s first recommendation—do your own vetting.
Required Certifications and Licensing
In New York State, home inspectors must be licensed. Verify your inspector’s credentials:
- NYS Home Inspector License: Required; license number should be displayed on business cards and websites
- Professional Certifications: Look for ASHI (American Society of Home Inspectors) or InterNACHI certification
- Errors & Omissions Insurance: Protects you if the inspector misses a major defect
- Experience Level: Prefer inspectors with 3+ years and 500+ completed inspections
Check the NYS Department of State Home Inspector Directory to verify licensing status.
Questions to Ask Before Hiring
Interview at least two or three inspectors before making your decision. Ask:
- “How long have you been inspecting homes, and how many inspections have you completed?”
- “Can I see a sample inspection report?”
- “Do you carry errors and omissions insurance?”
- “Are you familiar with Staten Island’s specific issues—flood zones, Sandy damage, oil tanks?”
- “How long will the inspection take, and can I attend?”
- “What’s your turnaround time for delivering the report?”
- “Do you offer specialized tests (termites, radon, mold, oil tank integrity)?”
Red Flags to Avoid
- Unwillingness to let you attend: Reputable inspectors welcome your presence
- Rushed inspections: A thorough inspection of a 1,500-2,000 sq ft home takes 2-4 hours
- No written report: Verbal summaries aren’t sufficient for negotiations or future reference
- Recommending specific contractors: This can indicate kickback arrangements
- Dramatically low fees: Prices well below the $400-$600 range may signal inexperience or corner-cutting
Expected Timeline
Plan for the inspection to take 2 to 4 hours for an average-sized Staten Island home (1,500-2,500 square feet). Larger properties, older homes, or those with extensive outbuildings require more time. Most inspectors deliver written reports within 24 to 48 hours.
What Happens After the Home Inspection
Receiving your inspection report is just the beginning. Now you need to interpret the findings, prioritize issues, and decide how to proceed.
Reading and Understanding Your Inspection Report
Professional inspection reports typically run 30 to 60 pages and include:
- Executive Summary: Overview of major findings and safety concerns
- Detailed Component Analysis: Room-by-room and system-by-system evaluation
- Photographs: Visual documentation of defects and concerns
- Recommendations: Suggested repairs, replacements, or further evaluation
- Maintenance Guidance: Tips for keeping systems in good condition
Focus on items flagged as “safety concerns” or “major defects.” These should be your negotiating priorities. Minor cosmetic issues—chipped paint, outdated light fixtures—aren’t typically worth requesting repairs.
Negotiating Repairs vs. Price Reductions
You have several options once you’ve reviewed the inspection report. Your approach depends on the issues discovered, market conditions, and your negotiating leverage.
Option 1: Request Specific Repairs
Ask the seller to complete necessary repairs before closing. This works well for:
- Safety hazards (faulty wiring, gas leaks, structural issues)
- Code violations that affect habitability
- Items that could prevent mortgage approval (damaged roof, failing septic)
Provide the seller with your inspector’s report and specific repair requests in writing. Set a reasonable deadline (typically 5-7 days) for their response.
Option 2: Negotiate a Price Reduction
Instead of repairs, request a lower purchase price to offset your future repair costs. This approach offers several advantages:
- You control contractor selection and work quality
- You can prioritize repairs based on urgency and budget
- Sellers often prefer a price reduction to coordinating multiple contractors
Get contractor quotes for major repairs to justify your price reduction request. If the roof needs $8,000 in work, request a $7,000-$10,000 price reduction (accounting for your time and hassle).
Option 3: Request a Seller Credit at Closing
A seller credit reduces your out-of-pocket closing costs while lowering the seller’s net proceeds. This can help if you’re tight on cash at closing but can handle repairs post-purchase.
Option 4: Walk Away
If inspection reveals severe issues—major foundation problems, widespread mold, extensive fire damage—and the seller won’t negotiate reasonably, exercise your inspection contingency to cancel the contract. You’ll receive your earnest money deposit back (typically within 10 business days).
What to Prioritize in Repair Negotiations
Not all inspection findings warrant negotiation. Focus on issues that affect:
- Health and Safety: Electrical hazards, structural defects, mold, lead paint
- Functionality: Failed HVAC, leaking roof, non-working plumbing
- Major Expenses: Items costing $1,000+ to repair or replace
- Permit and Code Compliance: Unpermitted additions, code violations
Don’t sweat the small stuff. Asking the seller to fix every minor defect can sour negotiations and risk losing the deal. A reasonable repair request might include 3 to 7 significant items—not a list of 30 cosmetic touch-ups.
When to Order a Reinspection
If the seller agrees to make repairs, consider ordering a reinspection (typically $100-$200) before closing. This confirms the work was completed properly and protects you from shoddy contractor work the seller hired.
Reinspections are particularly important for:
- Structural repairs (foundation, roof)
- Electrical or plumbing system work
- HVAC replacement or major repairs
- Any repairs costing more than $5,000
Frequently Asked Questions
Who pays for the home inspection?
The buyer typically pays for the home inspection as part of their due diligence process. The $400-$600 cost is separate from your down payment, closing costs, and earnest money deposit. Think of it as insurance against making a bad investment.
How long does a home inspection take?
A standard inspection takes 2 to 4 hours for most Staten Island homes. Larger properties (3,000+ square feet), older homes requiring extra scrutiny, or homes with multiple outbuildings may take 4 to 6 hours. Always attend the inspection in person so you can ask questions as issues are discovered.
Can the seller refuse to make repairs?
Yes. Unless you negotiated an “as-is” clause that explicitly requires specific repairs, sellers are not obligated to fix anything. However, most sellers recognize that refusing reasonable repair requests may cause the deal to fall apart—especially if your lender requires certain fixes for loan approval. In competitive seller’s markets, sellers have more leverage to refuse repairs.
What fails a home inspection in New York?
Home inspections don’t have official “pass” or “fail” grades. Every home has some defects, even new construction. However, these issues can derail a sale or require immediate attention:
- Significant structural damage (failing foundation, compromised load-bearing walls)
- Major electrical hazards (overloaded panels, aluminum wiring, exposed live wires)
- Roof failure requiring immediate replacement
- Plumbing system failures (sewage backup, contaminated water supply)
- Active pest infestations (termites, carpenter ants) causing structural damage
- Hazardous materials (asbestos, lead paint in poor condition)
Do I need separate inspections for termites and oil tanks?
Yes. Standard home inspections don’t include specialized testing for termites, oil tank integrity, radon, mold, or well/septic systems. If your home has an oil tank (common in older Staten Island properties) or your lender requires a termite inspection, you’ll need to hire specialists for these evaluations. Budget an additional $75-$150 per specialized test.
What if I find issues after closing that weren’t in the inspection report?
Inspectors can only evaluate visible, accessible components—they don’t tear open walls or excavate around foundations. If a problem was truly hidden and the inspector didn’t miss obvious warning signs, you likely have limited recourse against the inspector (though errors and omissions insurance may provide some protection).
However, if the seller knowingly concealed defects that should have been disclosed, you may have legal claims against them for fraud or misrepresentation. Review New York’s seller disclosure requirements and consult with your real estate attorney if you discover material defects the seller failed to disclose.
Ready to Move Forward with Your Staten Island Home Purchase?
A thorough home inspection is your best tool for making an informed buying decision. Armed with this checklist and an understanding of Staten Island’s unique inspection priorities—flood zones, Sandy legacy issues, oil tanks, and termites—you can negotiate confidently and avoid costly surprises.
Remember: the inspection isn’t meant to give you a perfect home. It’s meant to give you complete information about the home’s condition, so you can budget appropriately, negotiate fairly, and plan for future maintenance.
Schedule a Buyer Consultation
Working with buyers throughout Staten Island, Brooklyn, and New Jersey, we help you navigate every step of the home buying process—from pre-approval and inspector referrals to negotiating repairs and closing the deal.
Contact Robert DeFalco Realty to discuss your home search and get connected with trusted home inspectors in your target neighborhoods.
Want to understand your buying power before you start touring homes? See our guide on how much house you can afford in NYC and NJ. Already shopping specific neighborhoods? Explore our Staten Island neighborhood guide for relocating families to find the right community for your lifestyle and budget.
Article last updated December 2025. Home inspection costs, licensing requirements, and local regulations may change over time. Always verify current information with licensed professionals and your real estate attorney.